


The Rasa Learning Center launched in 2021. Talking to our community, I realized how very few folks know about it. So I wanted to revisit these resources and demonstrate how you can take advantage of our video guides to get started building with Rasa. Since there are many great resources in the Learning Center, I will highlight the key videos that can help you understand, install, and build AI Assistants with Rasa Open Source for the first time. If you follow the guide, you should be able to build a Rasa assistant in no time.
Below, I will link and provide highlights for the following videos:
- Introduction to Rasa
- Installation Process
- AI Assistant Build
- Rasa Pipeline Components
- How to use Slots, Custom Actions, and Forms
I would also like to give a big shoutout to Rachael, Vincent, and Justė for creating the Learning Center in the first place. Their amazing work has helped many developers in the community to get started and to deepen their AI/ML knowledge.
Introduction to Rasa
This video details two key components of Rasa: Natural Language Understanding + Dialogue Management. These two components facilitate Rasa’s ability to understand natural language queries and choose the next best action in response.
- NLU: This is the part of Rasa where the DIET classifier assigns user queries to intents and entities based on examples provided.
- Dialogue management: It is the part of Rasa that predicts the next best action to take following a user interaction. There are several different policies and rules that help Rasa do this out of the box.
Check out this tutorial to get an idea of how Conversational AI Assistants have traditionally managed the dialogue flow with conditional dialogue trees and how Rasa elevated this approach with machine learning to reduce the need for complex dialogue trees.
How should we design conversation?
The Rasa approach is flexible, but it works better with high-quality data that you collect from real user conversations. That means you'll want to review and annotate conversations as you build your assistant. There is a human-in-loop approach with Rasa, where it can learn from its mistakes. We call this approach to chatbot development "Conversation-Driven Development.”
For details, click here.
Creating a New Assitant
Rasa installation: This video should give you a helpful guide on how to install Rasa, Rasa prerequisites, file structure, and terminal commands.
To install Rasa, you will need this command.
python -m pip install rasa
Installation guides for different Operating Systems:
Windows
MacOS
Ubuntu
Files: After you have installed rasa and run the command rasa init to set up your Rasa project, it should have the following file structure.
- The domain.yml file is the file where everything comes together.
- The config.yml file contains the configuration for your machine-learning models.
- The data folder contains data that your assistant will learn from.
- The nlu.yml file contains examples for your intents and entities.
- The stories.yml file contains examples of conversation turns.
- The rules.yml file contains predefined rules for the dialogue policies.
To train a new assistant based on your current out-of-the-box training data, userasa train.
Once you have trained your assistant, you can chat with your trained assistant using the command.
rasa shell
For details, click here.
The Domain File
The domain.yml is the configuration file of everything your assistant "knows." It contains
- Responses: These are the things the assistant can say to users.
- Intents: These are categories of things users say.
- Slots: These are variables remembered over the course of a conversation.
- Entities: These are pieces of information extracted from incoming text.
- Forms and actions: These add application logic & extend what your assistant can do.
For example, to add an event in google calendar, the domain file looks like this:
version: "3.1"

intents:
  - greet
  - goodbye
  - affirm
  - deny
  - mood_great
  - mood_unhappy
  - bot_challenge
  - add_event
  - get_event

entities:
- event
- time


slots:
  event:
    type: text
    mappings:
    - type: from_entity
      entity: event
      intent: add_event

  time:
    type: text
    mappings:
    - type: from_entity
      entity: time
      intent: add_event


forms:
  event_form:
    required_slots:
    - event
    - time

actions:
  - action_hello_world
  - action_add_event
  - action_get_event

responses:

  utter_greet:
  - text: "Hey! How are you?"

  utter_goodbye:
  - text: "Bye"

  utter_iamabot:
  - text: "I am a bot, powered by Rasa."

session_config:
  session_expiration_time: 60
  carry_over_slots_to_new_session: true
For more details, click here.
Training Data & Rules
Training Data refers to the textual data used to train conversational AI models. This includes user-generated text. It could include customer support logs, assuming data collection & re-use is covered in your privacy policy, or user conversations with your assistant.
The three files that are a part of the training are stories, rules and nlu.
-
Stories: Learn how to create stories, create and train the model, and learn patterns of conversations. Creating your patterns is also possible, but we recommend using interactive learning (via the rasa interactive command) to get started.
-
Rules are training data used to train your assistant's dialogue management model. Rules provide a way to describe short conversations that should always go the same way. The main difference between a rule and a story is that a story can be seen as an example to learn from, while a rule is a pattern the assistant must follow.
-
NLU: The last part is the Intent. In conversational AI, intent refers to the category of intent it belongs to assigned by the NLU model So that the assistant can choose the best response.
For example, intent of greet, can be Hi, Hello
nlu:
 - intent: greet_smalltalk
   examples: |
   - hi
   - hello
   - howdy
   - hey
   - sup
   - how goes it
   - whats up?
for details, click here
Entities
An entity can be any important detail your assistant could use later in a conversation. This includes
- Numbers
- Dates
- Country names,
- Product names.
Entities are a part of Intent in the NLU file, for example.
nlu:
 - intent: inform
   examples: |
   - My account number is [1234567890](account_number)
 - regex: account_number
   examples: |
   - \d{10, 12}
Detecting Entities: Pre-built Models and the DIET-based machine learning approach are the two popular methods for detecting Entities. Entities can also influence stories; for details, click here.
Slots
In Rasa, slots are your long-term memory in a conversation. If there's any information you'd like to store for later use (i.e., in forms), you'd typically want to store it in a slot. Or if you are working on a Form, don’t forget to incorporate slots while designing the dialogue flows.
Many questions on the Rasa forum are about slots and slot mapping. You could store any information in a slot, even if no entity has been detected, but it is very common to fill a slot value with an entity value. For example,
entities:
  - entity_name

slots:
  destination:
    type: any
    mappings:
    - type: from_entity
      entity: entity_name
      intent: make_transaction
This class also covers slot mapping, types of slots, and how they influence conversations. Slot mappings allow you to define how each slot will be filled in types of slot mapping are intent, non-intent, role, and group.
Different methods of extracting slots are, from_entity, from_intent, and You can store the full text the user has a message as a slot value. This is done via the from_text slot mapping. For example.
slots:
  slot_name:
    type: text
    mappings:
    - type: from_text
Remember that slot mapping and types influence forms and conversation. For example, setting slots in stories.
stories:
- story: booking a flight ticket
   steps:
   - intent: book_a_ticket
   - or:
    - slot_was_set:
      - destination: Toronto
    - slot_was_set:
      - destination: London
. Click here for more details.
Responses
Responses are a part of the domain.yml file. Responses are not static, and they could be images, URLs, or custom responses that can be sent via Custom Actions. For more details, click here.
Pipelines and Policies
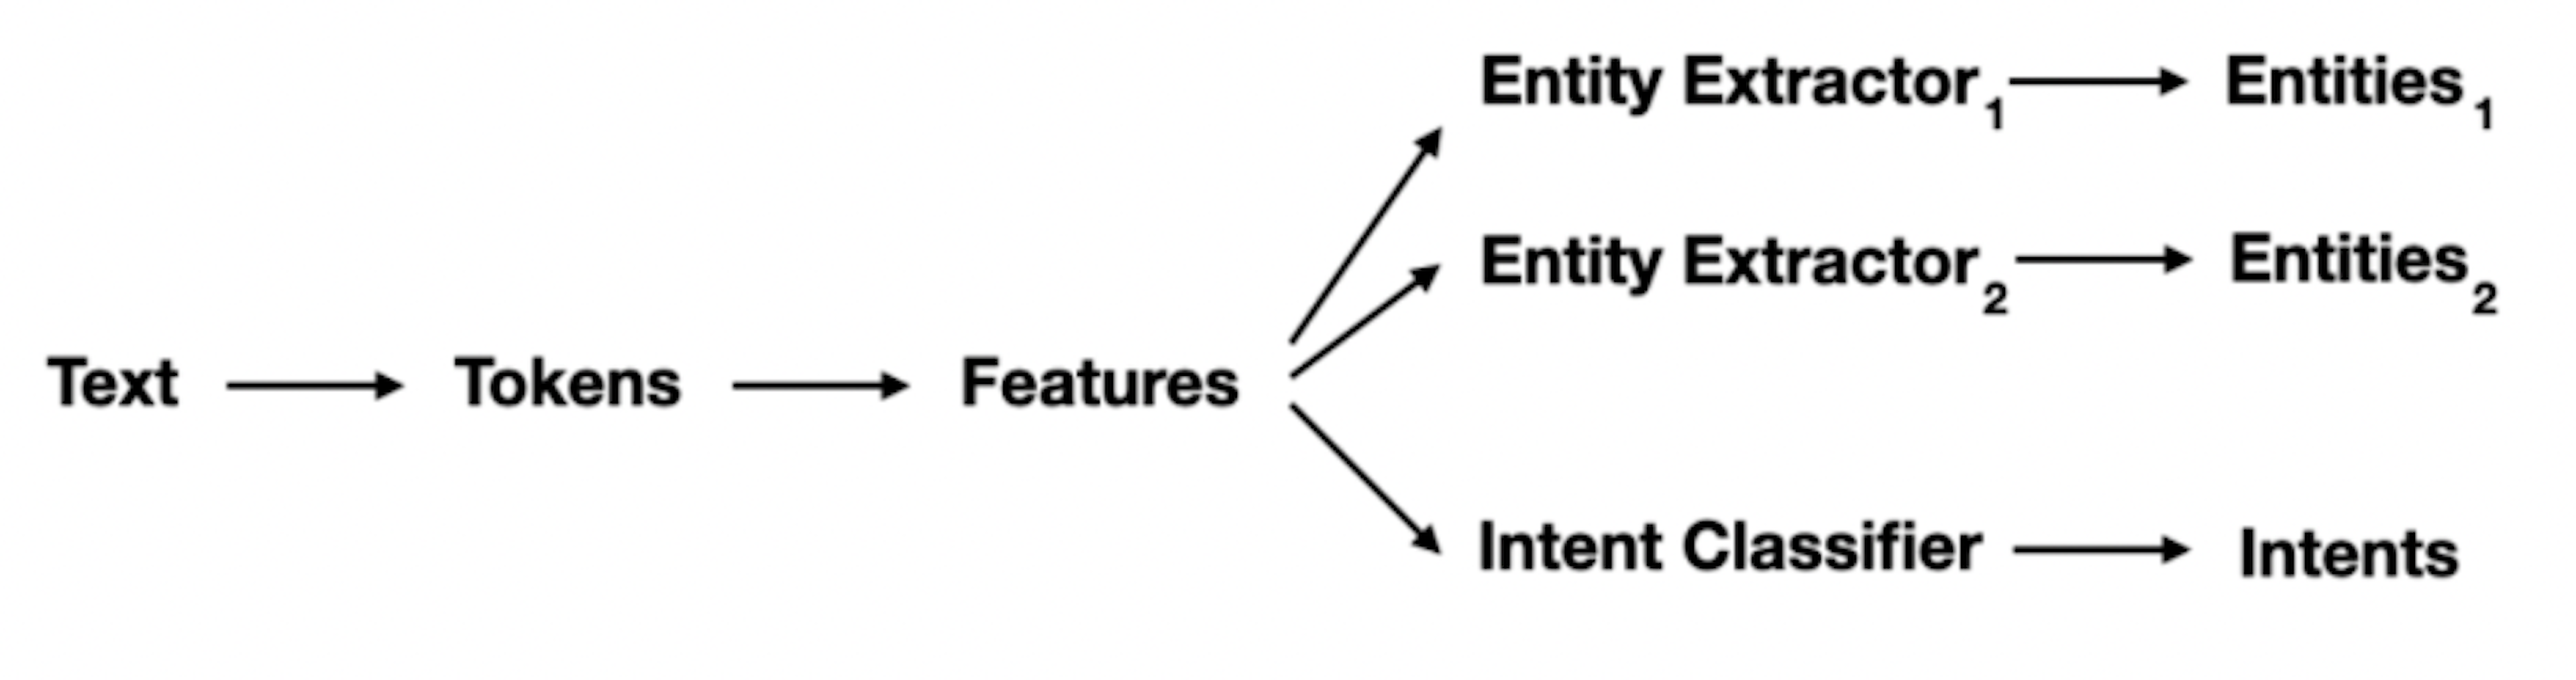
We know Rasa uses NLU for intent and entity detection, while dialogue management is used to select your AI assistant’s next best response. Both of these two components can be further configured in the file config.yml. This is where you define your NLU pipelines and dialogue management policies are defined. The pipeline part takes care of intent prediction and entity extraction. The policies part takes care of dialogue management.
The pipeline consists of the NLP tasks we carry out once we have the inputs. This includes components like
- Tokenizers - splitting the sentence into words, or chunks
- Featurizers - since computers can’t understand the words, it has to be converted into embeddings. The two major types of featurizer are Sparse and dense featurizer.
- Intent Classifiers- classification of Intents with DIET classifier
- Entity Extractors - Entity is also one of the outputs of DIET. Still, it’s also possible to use RegexEntityExtractor and SpacyEntityExtractor instead of DIET.
In the pipeline, the text goes to the tokenizer that split the sentence into words or chunks called tokens. Then the featurizer changes those tokens into a more computer-readable format called embeddings. From there entity extractors can be used like Spacy or Regex and DIET. Also, these embeddings are used for Intent classification. The whole pipeline looks like this:
Rasa uses policies to decide which action to take at each step in a conversation. There are three main policies that the default config.yml file starts out with:
- The RulePolicy handles conversations that match predefined rule patterns. It makes predictions based on any rules you have in your rules.yml file.
- The MemoizationPolicy checks if the current conversation matches any of the stories in your training data. If so, it will predict the next action from the matching stories.
- The TEDPolicy uses machine learning to predict the next best action.
For details on Pipeline and Policies, click here.
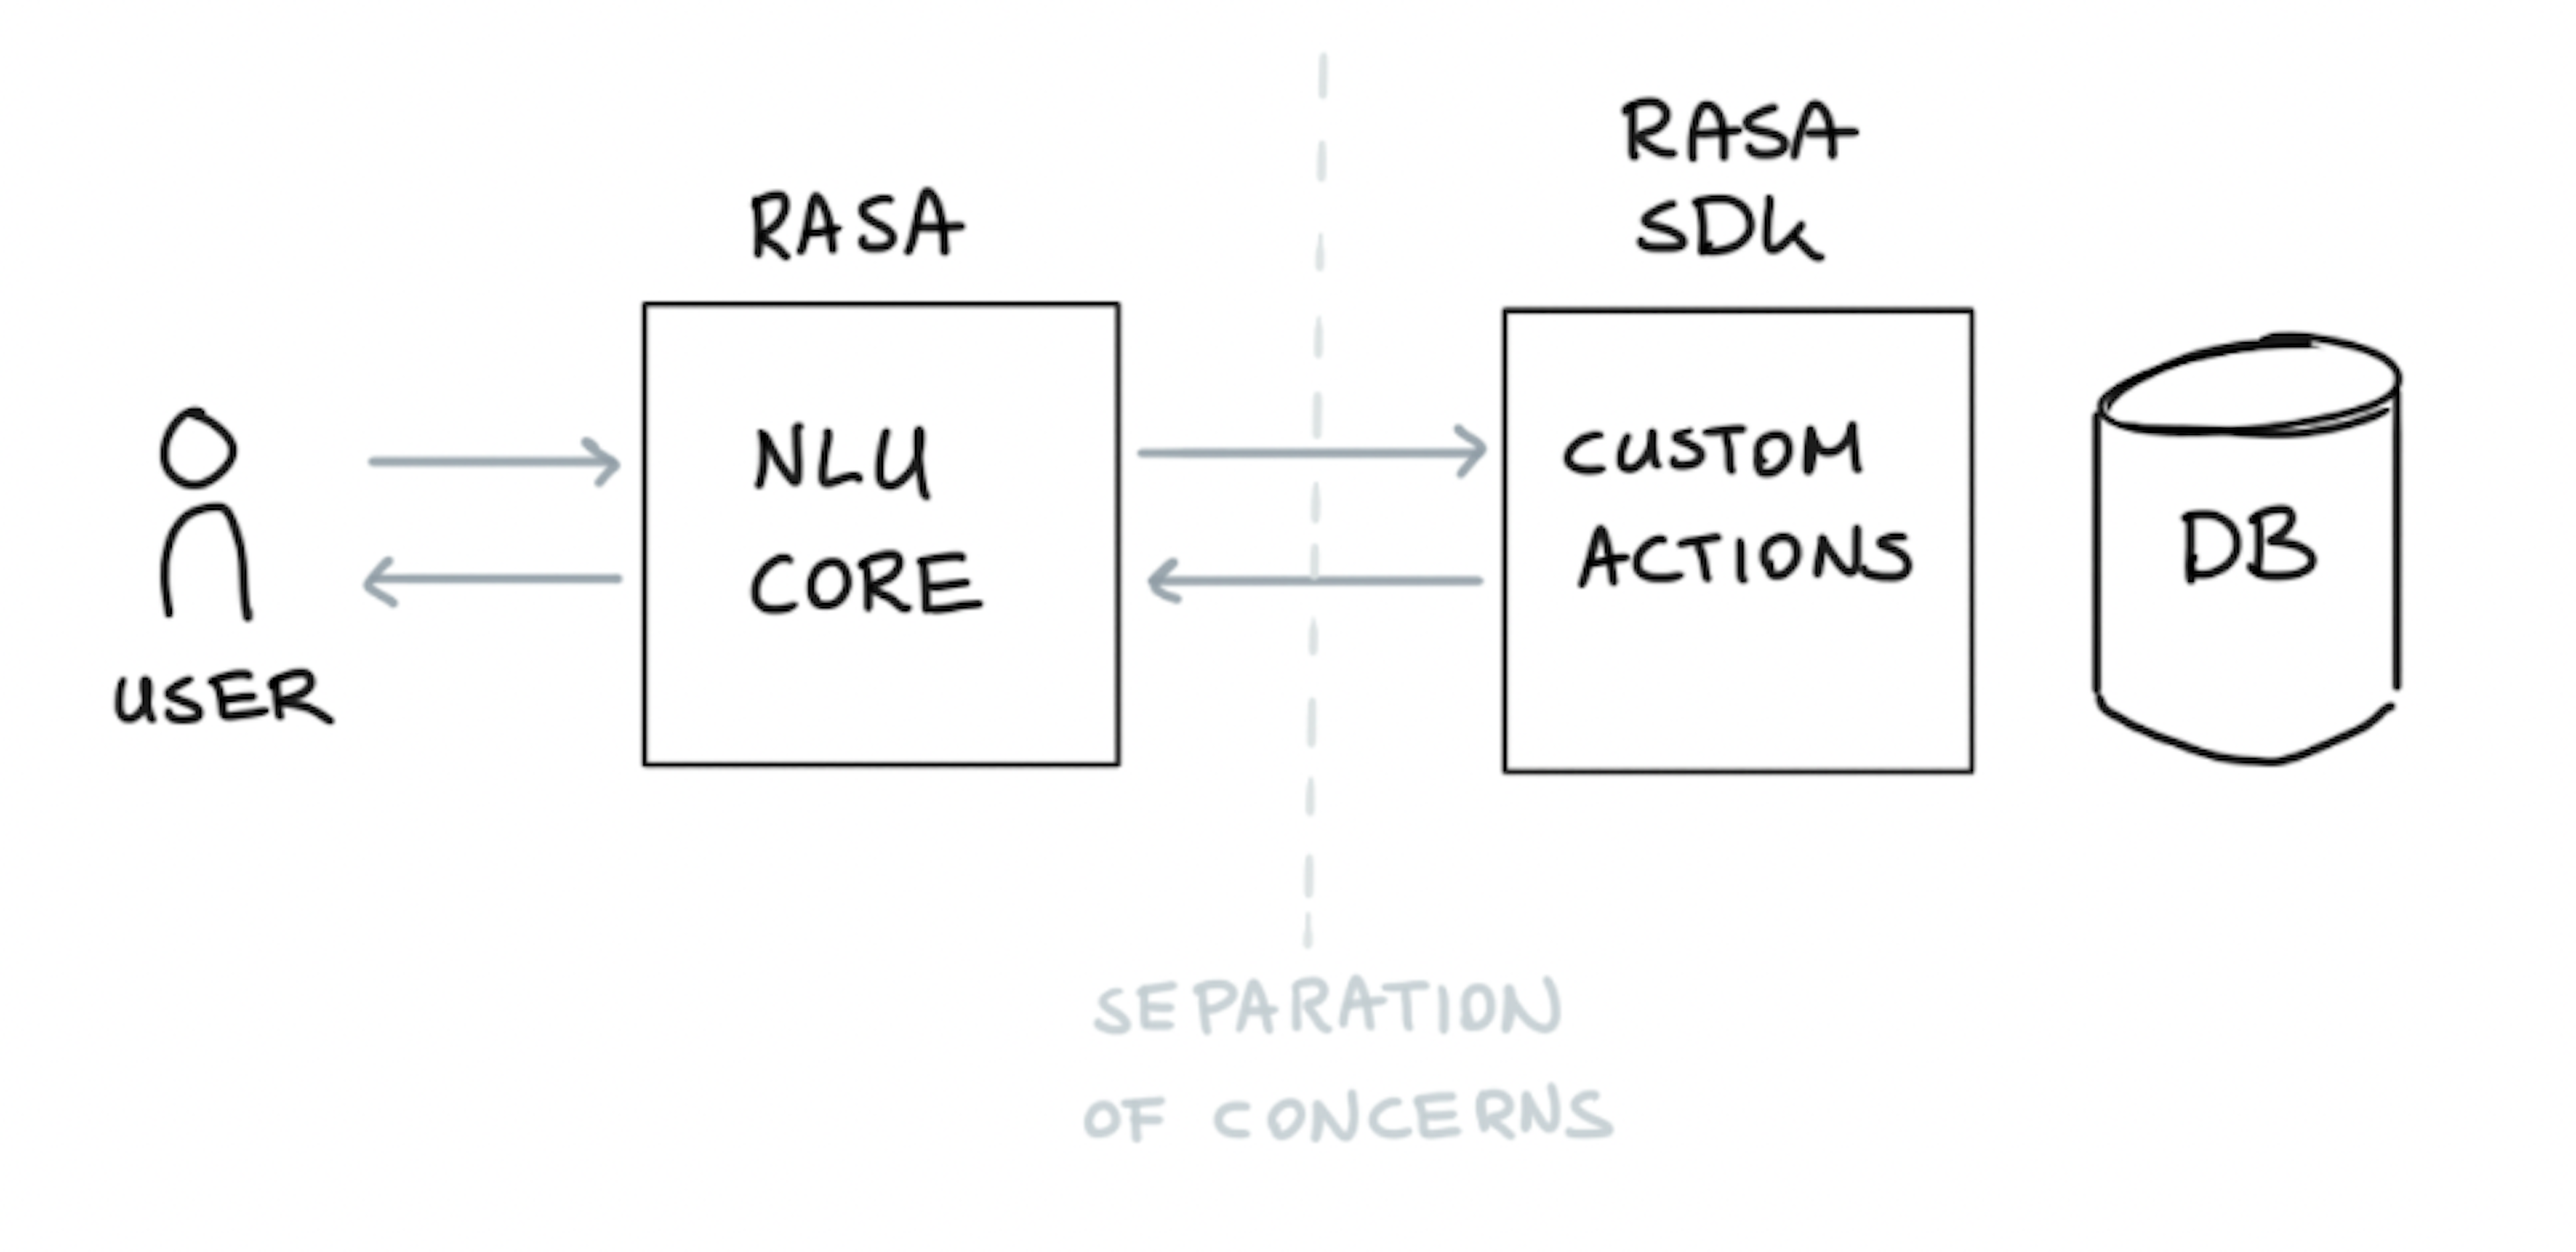
Custom Actions
We have seen situations where assistants can provide a response with a text, but what if we need to extract information from an API or database? That’s where Custom Actions comes into play, where instead of triggering a response text, we can trigger a custom python function.
Two things to remember while running Custom Actions:
- If you want to interact with an assistant with a custom action, remember that before you run
rasa shellyou'll want to start the action server first.
Run this in a separate terminal
rasa run actions --port 5055 - You should also check your
endpoints.ymlfile before running the Rasa shell.
action_endpoint:
url: "http://localhost:5055/webhook"
As we have already seen in slots, you can set and retrieve slot information using Custom Actions. For details, click here.
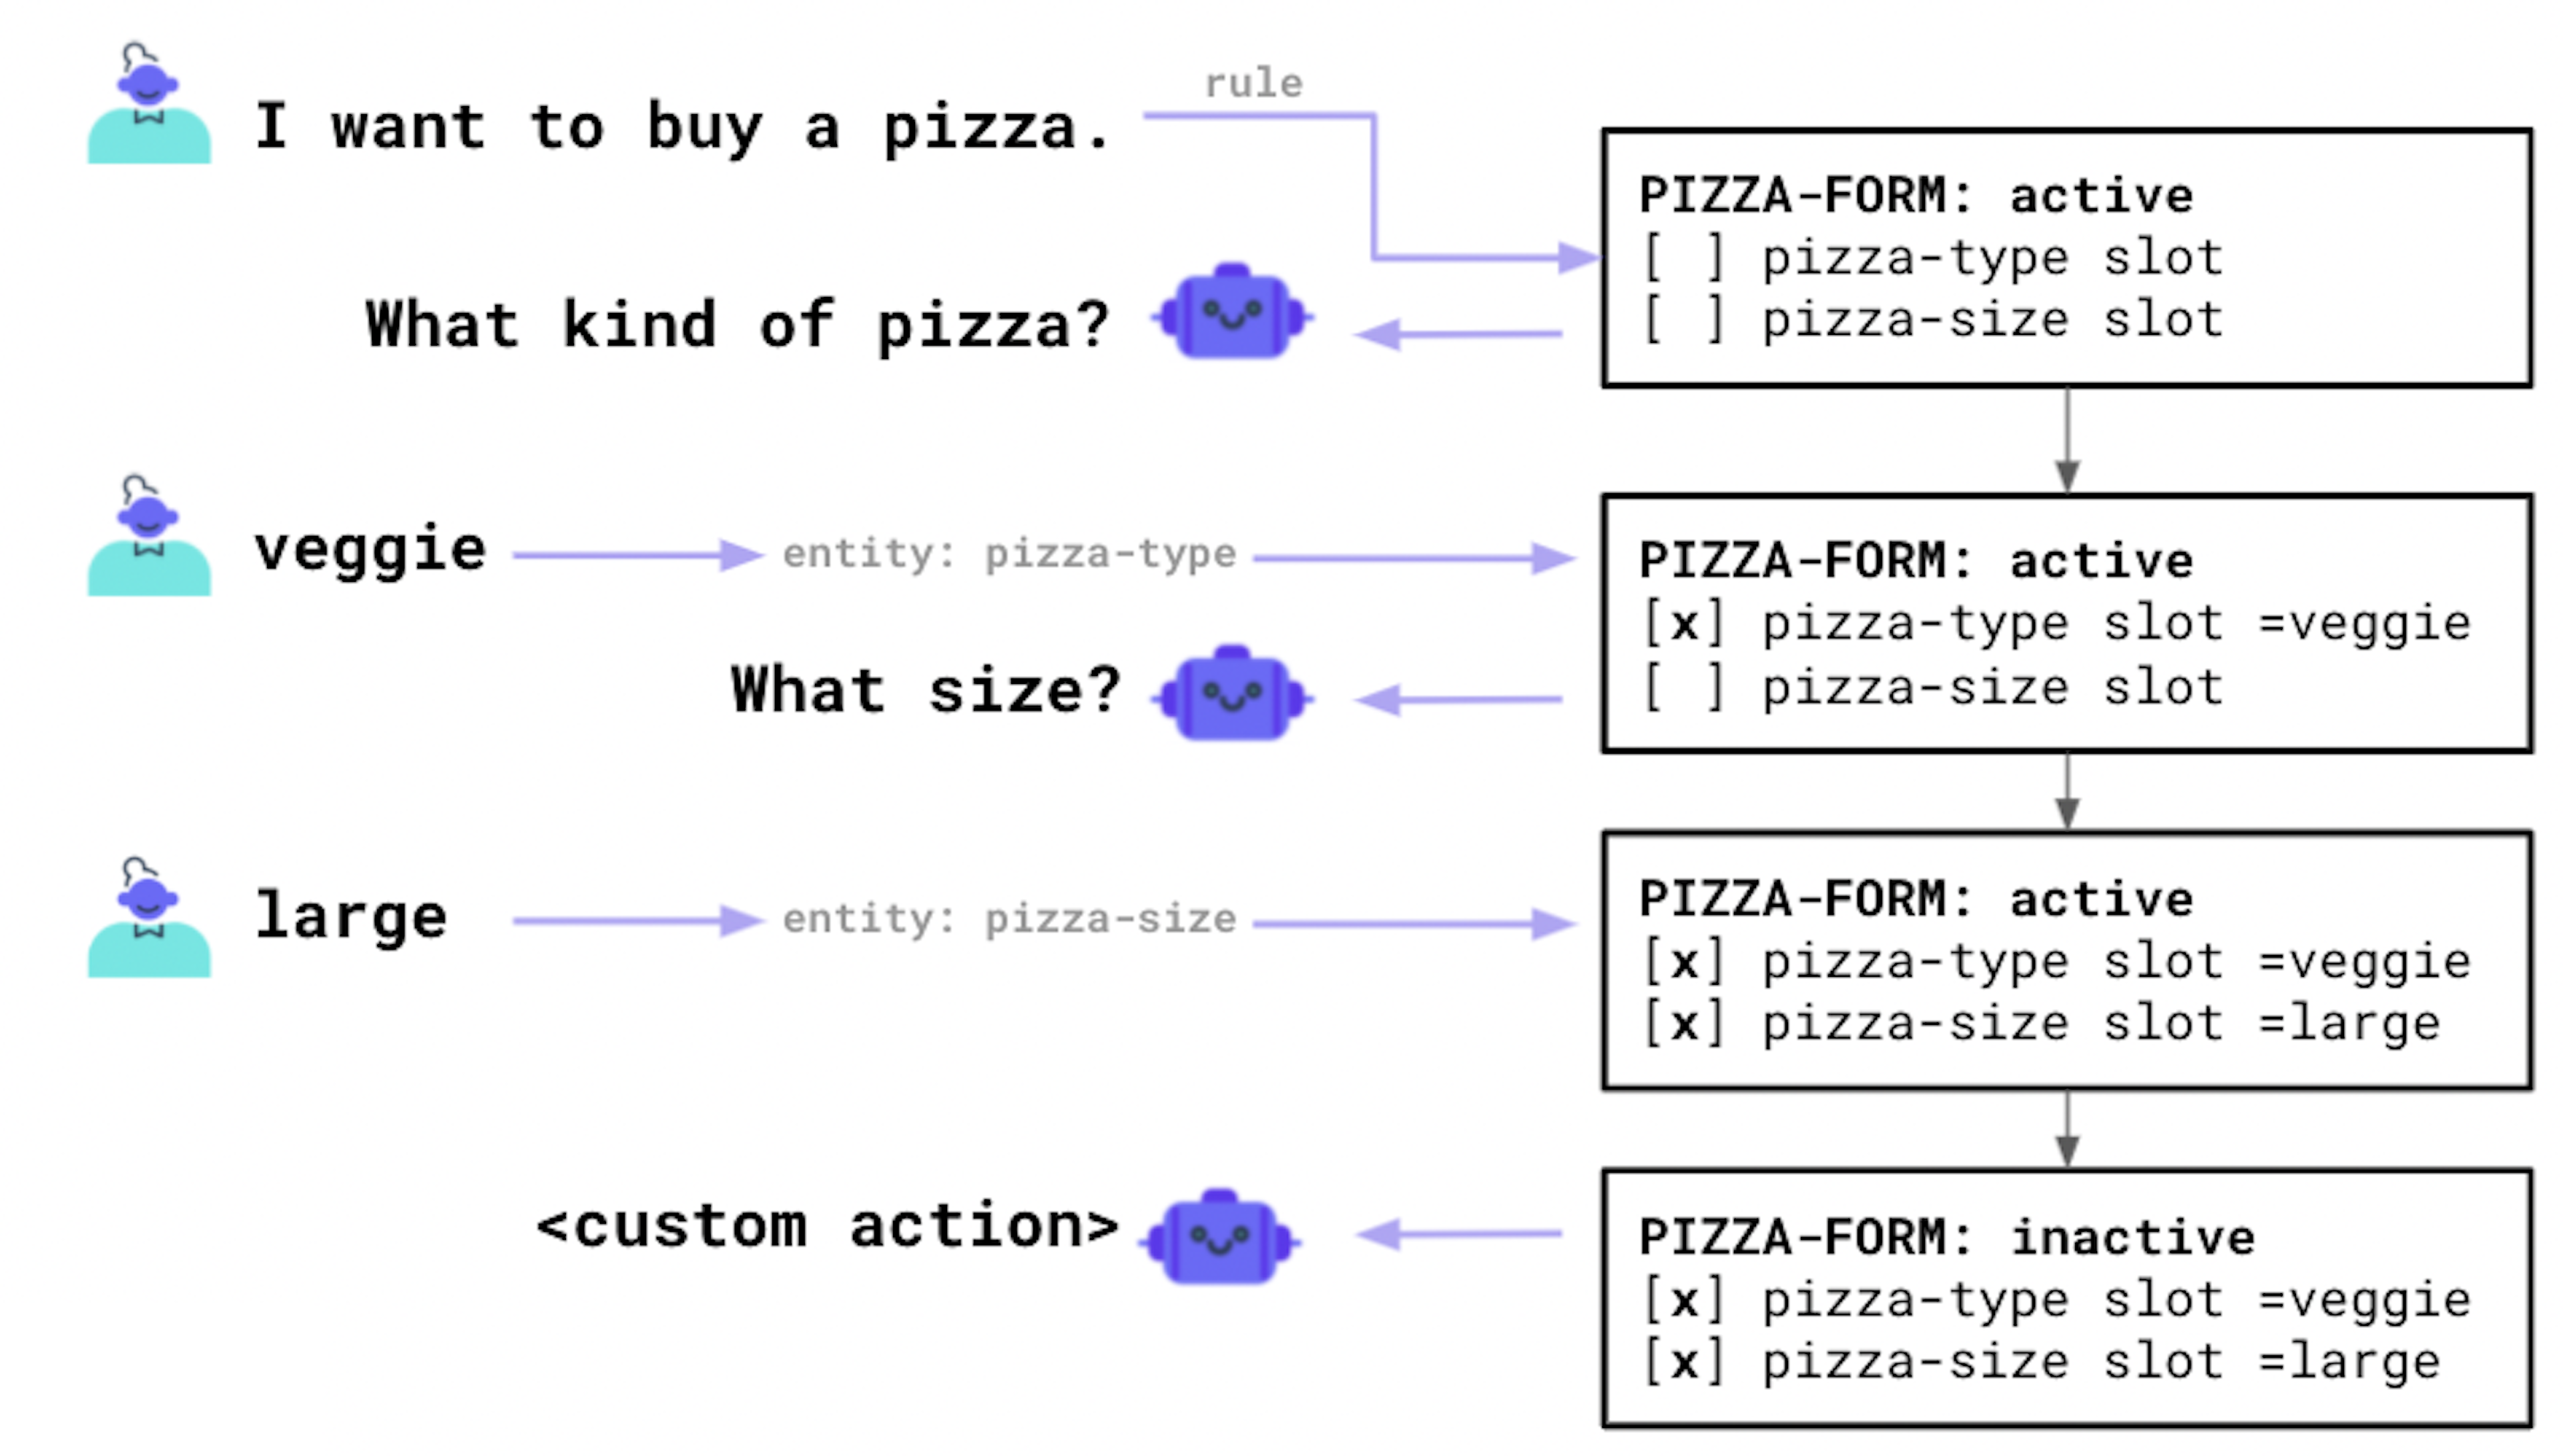
Basic Forms
The idea behind Forms is to retrieve information needed to complete the conversation process and take action. Conceptually, a form can be seen as a loop that keeps asking the user for information until enough slot values have been filled. In case you need to come out of the loop, even if the slot values are not filled, you need to use a custom form. An example of such a flow is shown in the diagram below, with an example of pizza form.
How to set up a form?
To set up a basic form, you'll need to change your domain.yml file to configure the form and slots, but you'll also need to update your rules.yml file so that Rasa understands when you trigger a form loop.
Sometimes the inputs that don’t make sense inflow of the conversation are provided; for eg., If the assistant asks the type of pizza the customer asks If he is talking to an
Assistant. Thus, we need to validate the form by adding a Custom Action.
There are a few things to note.
- Note that our
validate_<form_name>class inherits fromFormValidationAction, which is different from the standard Action class that is inherited from custom actions.. - The name method defines the name of the validator, which needs to correspond with the name in our
domain.ymlfile and needs to adhere to thevalidate_<form_name>naming convention. - For each slot, we have a
validate_<slot_name>method. Again, we need to follow a naming convention.
For more details, click here.
Custom Forms
It’s also important to make forms customizable and robust against the unhappy path, meaning when the interaction with the assistant is interrupted. For example, the bot returns to the form after handling an interruption in steps. The idea here is that we can add rules that are able to handle an "interrupt" that occurs from within a form.
rules:
- rule: Interruption in Pizza Form
  condition:
  # Condition that form is active.
  - active_loop: simple_pizza_form
  steps:
  # This unhappy path handles the case of an intent `bot_challenge`.
  - intent: bot_challenge
  - action: utter_iamabot
  # Return to form after handling the `bot_challenge` intent
  - action: simple_pizza_form
  - active_loop: simple_pizza_form
But when the response is complex, we use policy, rule policy, and memorization policy. This could be included in rules and stories accordingly. Also, there could be cases where the user decides to stop the conversation. In that case, we need to think about ways to deactivate the loop of a form, as given in this example.
stories:
- story: User interrupts the form and doesn't want to continue
  steps:
  - intent: greet
  - action: utter_greet
  - intent: buy_pizza
  - action: simple_pizza_form
  - active_loop: simple_pizza_form
  - intent: stop
  - action: utter_ask_continue
  - or:
    - intent: stop
    - intent: affirm
  - action: action_deactivate_loop
  - active_loop: null
Once the stop intent is detected in a form, we ask the user if they are sure. They can use either the stop or affirm intent to declare what they want to happen. If it's clear the user wants to stop, we trigger the action_deactivate_loop action and terminate the loop.
To learn advanced customization, click here.
This is the second post in our series on the revisiting learning center.
Do visit Rasa Learning Center here and ask any questions on the Forum.